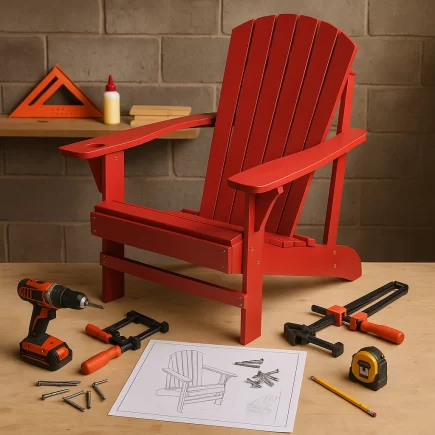


Building an Adirondack chair is a rewarding project that combines practicality with the joy of crafting your own outdoor furniture. This chair is known for its deep seat, tall back, and wide armrests, making it an ideal choice for outdoor relaxation. Whether you are a seasoned DIYer or a first-time builder, the following guide will walk you through the process of creating a sturdy and comfortable Adirondack chair.

This expert guide is tailored for those who want to take on the project and enjoy the process from start to finish.
Materials Needed for Your Adirondack Chair
Before you start building, it’s essential to gather all the materials you’ll need. Each component plays a crucial role in ensuring the chair’s stability and comfort.
| Material | Dimensions | Purpose |
| Pressure-Treated Lumber | 5/4 x 6-foot decking lumber | Main structure for the seat, legs, and back. |
| Screws | 1 5/8-inch and 2 1/2-inch | Stainless steel deck screws for assembly. |
| MDF Template | 3/4-inch thickness | Used for cutting curved pieces. |
| Tools | Varies (listed below) | Essential tools for cutting, shaping, and assembling parts. |
Additional Tools Needed:
- Jigsaw
- Bandsaw
- Miter saw
- Drill/driver
- Router with 1/4-inch roundover bit
- Sandpaper (80-, 120-, and 180-grit)
- Rafter square
Step-by-Step Guide to Building an Adirondack Chair
Now that we have the materials ready, let’s dive into the step-by-step process. Each step has been outlined carefully to ensure you can follow along without missing any key details.
Step 1: Making the Templates
Materials: MDF (3/4-inch thickness)
Start by creating cardboard templates from the chair plans. Then, transfer these templates to MDF and cut them out using a jigsaw. Once the shapes are cut, sand the edges smooth and drill pilot holes for further guidance when cutting the actual lumber. These templates will be used to create accurate curves for the chair’s design.
Tip: To make sure all pieces are uniform, take extra care to align the templates precisely. Mistakes here could lead to uneven parts.
Step 2: Cutting the Curved Pieces
Materials: Pressure-treated decking lumber
Using your MDF templates as guides, cut the curved pieces of the chair. A bandsaw or jigsaw works best for this step. Make sure to cut accurately along the lines of the templates. If you’re working on the armrests, rip two 1-inch strips of lumber to glue onto the armrest stock, ensuring they are wide enough to accommodate the templates.
Now that you have your templates, it’s time to cut the wood for the Adirondack chair. You’ll need to cut the following pieces:
Chair Parts
- Side Rails (2 pieces): 1 x 5 1/4 x 33 3/4 inches
- Back Rails (2 pieces): 1 x 4 1/4 x 23 1/4 inches and 1 x 3 1/2 x 23 1/4 inches
- Seat Slats (9 pieces): 3/4 x 2 1/4 x 23 1/4 inches
- Back Slats (7 pieces): 3/4 x 3 1/4 x 35 1/2 inches
- Front Legs (2 pieces): 1 x 4 1/4 x 20 1/2 inches
- Back Legs (2 pieces): 1 x 2 1/2 x 29 inches
- Arm Brackets (2 pieces): 1 x 2 3/4 x 6 1/2 inches
- Armrests (2 pieces): 1 x 5 1/4 x 28 inches
- Foot (2 pieces): 1 x 5 1/4 x 16 inches
Step 3: Trim the Curved Pieces
After cutting the pieces, the next step is trimming. This will be done using a benchtop router with a straight bit. The router’s bearing will follow the template to trim each piece to its desired shape. This ensures accuracy and smoothness.
Tip: Don’t rush through this step. A steady hand will lead to better results, and a well-trimmed piece will make the assembly much easier.
Step 4: Tapering the Back Slats
Next, set up a tapering jig on a table saw to cut the back slats at the correct angle, as specified in the chair plans. These slats will form the curved, fan-like backrest of the chair. After cutting to 3/4-inch thickness, smooth out the ends using a bandsaw. Make sure each back slat matches the template angle precisely.
Step 5: Taking Off the Sharp Corners
To finish the pieces, drill pilot holes using the MDF template as a guide. Then, use a router with a 1/4-inch roundover bit to soften the edges of each part. This not only enhances the aesthetic of the chair but also prevents sharp corners that could be uncomfortable when sitting.
Tip: Use sandpaper to further smooth out any rough edges after routing.
Step 6: Assembling the Legs
Materials: Pressure-treated decking lumber (5/4 x 6-foot)
For the legs, start by attaching a bracket perpendicular to each front leg. Then, secure the seat support to the front legs with 1 5/8-inch screws. The seat support should extend 3 1/2 inches past the front leg, providing stability for the structure.
Tip: Double-check the alignment of the legs to make sure the chair will sit evenly on the ground.
Step 7: Joining the Sides
Stand up the main supports and begin fastening the seat slats to the front edges of the main supports. Allow the slat ends to extend 1/2 inch past the supports for a clean, consistent look. Attach the bottom stretcher, ensuring that it extends 1/2 inch past the supports.
Step 8: Adding the Seat Slats
The rear seat slat should be beveled, tapering from 3/4-inch thick at the front to 1 inch thick at the back. Attach this slat to the main supports using 1 5/8-inch screws. The remaining slats should be evenly spaced, with a 1/2-inch gap between each one.
Step 9: Attaching the Back Supports
Now it’s time to attach the back supports. Align the bottom ends of each back support with the bottom edges of the main supports. The supports should be positioned 8 1/4 inches from the leg joints. Fasten the back supports and rear armrest brackets securely with 1 5/8-inch screws.
Step 10: Attaching the Back Slats
Screw the center back slat to the middle back stretcher first. Then, align the remaining back slats so their tops form a smooth curve from side to side. Leave a 3/8-inch gap between each slat for uniform spacing. Attach the slats to the middle back stretcher with 1 5/8-inch screws, and secure them to the bottom stretcher as well.
Step 11: Securing the Armrests
- Align the left armrest with the left front leg and armrest brackets.
- Ensure the armrest sits flat against the top of the front leg.
- Line up the armrest’s pilot holes with the top edge of the front leg and the armrest brackets.
- Secure the armrest in place using four 2 1/2-inch screws.
- Check for level alignment and a tight fit during the process.
- Repeat the procedure for the right armrest.
- Ensure both armrests are securely attached and symmetrical.
Step 12: Attaching the Top Back Stretcher
- Position the top back stretcher to be centered from right to left.
- Ensure the stretcher aligns correctly with the back slats.
- The stretcher should rest snugly across the top of the back slats.
- Drive a 1 5/8-inch screw into each of the back slats through the stretcher.
- Secure the stretcher firmly in place to prevent slat twisting or warping.
- This step ensures that the back structure is robust and stable for long-term use.
Final Touches: Sanding and Coating
Once your Adirondack chair is fully assembled, it’s time for the final touches. Start by sanding the chair using 120-grit sandpaper to smooth out any rough areas. Cedar wood, which is commonly used for Adirondack chairs, is soft and oily, so it may require more effort than harder woods like pine.
For the finish, apply a protective coating such as Sikkens Cetol 1, 077 Cedar. This will help protect the chair from weather elements. Allow each coat to dry for 24 hours before applying the next, ensuring long-lasting protection.
From gathering materials to the final touches, you’ll have everything you need to complete this DIY project. If you’re looking to buy one, visit Aosom’s Adirondack Chairs, where we offer high-quality outdoor patio chairs to complement your backyard setup.
FAQS
1.How can I make sure the Adirondack chair is sturdy?
To ensure the chair is sturdy, use high-quality, weather-resistant wood such as cedar or pine. Make sure all joints are securely fastened with screws or wood glue, and reinforce the legs with additional support braces. Regularly check for wear and tear to maintain stability.
2.What tools do I need to build an Adirondack chair?
Essential tools for building an Adirondack chair include a saw (circular or miter), drill, measuring tape, sandpaper, clamps, and a screwdriver. Having a jigsaw or sander on hand can also help smooth edges and make assembly easier.
3.How do I finish the Adirondack chair for outdoor use?
For outdoor use, apply a protective finish like outdoor varnish or paint to prevent the wood from deteriorating due to the elements. Be sure to let each coat dry thoroughly, and reapply annually for optimal protection.
4.How do I make sure the seat is comfortable?
To enhance comfort, ensure the seat angle is slightly sloped, and the backrest is at a gentle incline. Adding a cushion or padding to the seat and backrest will further improve comfort, especially for extended sitting periods.
5.Can I build an Adirondack chair without any prior woodworking experience?
Yes, an Adirondack chair is relatively easy to build for beginners. Use simple step-by-step instructions, and take your time with each cut and assembly step. Patience and precision are key to achieving a successful project.