




























A tool cart works best when every tool has one fixed spot and every section serves a clear purpose. This guide breaks the process into clear steps, from initial sorting to long term protection against rust and clutter, so anyone can build a system that lasts.
Step 1: Sort Every Tool Before Organizing
Sorting tools before placing them back in the cart is the first step because it prevents broken or unnecessary items from taking up space. Pull every tool out and lay it on a flat surface so nothing gets missed.
Divide everything into three groups.
- Tools used weekly or more.
- Tools used occasionally for specific projects.
- Tools that are broken, duplicated, or rarely touched.
Anything in the third group should be donated, discarded, or moved to separate storage outside the cart. This keeps the cart reserved for tools that are actually in active use.
Step 2: Group Tools by Category and Frequency of Use
Grouping tools by category means placing similar tool types together so related items can be found in one location instead of scattered across multiple drawers. This step focuses on organizing what remains after the initial cleanup.
A simple category structure looks like this.
| Category | Examples | Suggested Location |
| Power tools | Drills, saws, sanders. | Middle or lower section. |
| Hand tools | Wrenches, pliers, hammers. | Upper section. |
| Measuring tools | Tape measures, levels, squares. | Top surface. |
| Fasteners | Screws, bolts, nails. | Small parts organizer. |
| Safety gear | Gloves, glasses, ear protection. | Side hooks or tray. |
Within each category, tools used daily should be positioned closer to the front or top of their section, while specialty tools used only for occasional projects can sit further back.
Choosing What Goes on the Top Surface
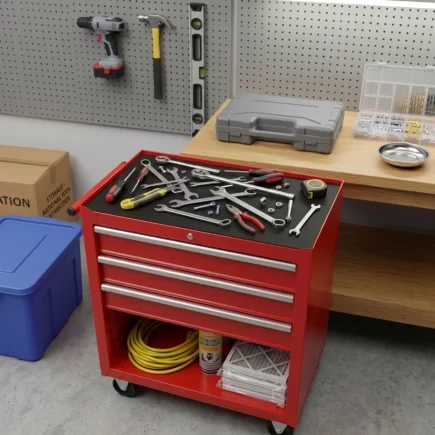
The top surface of a tool cart should hold only the handful of tools reached constantly throughout the day, since this area has no walls or drawers to contain clutter. Overloading it makes the entire cart feel disorganized even if the drawers underneath are perfectly sorted.
Strong candidates for this space include a tape measure, a utility knife, a pencil, and a small parts tray. Limiting this surface to just a few items also reduces the chance of tools falling off when the cart is moved.
Step 3: Assign Drawers by Tool Size and Weight
Organize each drawer by both tool size and weight to maximize storage space and keep the cart balanced. Storing similar-sized tools together prevents small items from getting buried beneath larger ones, while placing heavier tools in the lower drawers improves stability and makes the cart easier to move.
For added organization, use custom-cut EVA foam inserts (shadow foam) inside the drawers. These foam inserts hold each tool securely, prevent movement during transport, protect tools from scratches, and make it easy to spot when a tool is missing.
A practical drawer layout includes:
- Top drawer: Small, lightweight hand tools such as screwdrivers, pliers, and measuring tools.
- Middle drawers: Medium-sized tools like socket sets, ratchets, and wrenches.
- Bottom drawer: Heavy or bulky items such as power tools, hammers, and larger equipment.
This tiered layout, combined with foam drawer organizers, keeps tools protected, easy to locate, and efficiently arranged for everyday use.
Step 4: Place Heavy Tools on Lower Shelves for Stability
Placing heavy tools on lower shelves is a safety requirement, not just an organizational preference, because excess weight stored high on a cart increases the risk of tipping. This matters most on rolling carts, where an uneven load can shift suddenly during movement.
Power tools, dense wrench sets, and other bulky equipment should stay on the bottom shelf regardless of how often they are used. A cart that feels unstable or top heavy when pushed is a clear signal that weight distribution needs to be corrected immediately.
Step 5: Add Drawer Dividers and Foam Inserts for Protection
Drawer dividers and foam inserts protect tools by giving each item a fixed position so it cannot slide, knock into neighboring tools, or collect scratches during transport. Foam inserts can also be custom cut to match the exact shape of a tool set.
Benefits of using dividers and foam inserts include the following:
- Reduces tool movement during transport.
- Prevents metal on metal scratching.
- Makes missing tools easy to spot at a glance.
- Extends the lifespan of blades and precision tools.
This step matters most for tools with sharp edges or fine calibration, since even small impacts can affect performance over time.
Step 6: Store Small Parts, Screws, and Bits Separately
Small parts should always be stored in a dedicated compartment separate from larger tools, since loose screws and bits are the most common cause of drawer clutter. Mixing hardware with bigger items makes both harder to find.
A stackable small parts organizer with individual compartments works well for this purpose. Clear lids allow contents to be seen without opening every section, and compartments can be grouped by size or type such as screws, drill bits, nails, and washers.
Step 7: Label Drawers and Bins for Fast Access
Labeling drawers and bins keeps an organized cart functional over time by removing the guesswork of where each tool belongs. Even a well planned system breaks down within weeks if nothing is marked.
Simple text labels on drawer fronts or bin lids are enough for most setups. This step becomes especially useful in shared garages or job sites where multiple people access the same cart throughout the day.
Step 8: Maximize Space in a Compact or Small Cart
Maximizing space in a small cart requires layering storage vertically instead of spreading tools flat across a single drawer surface. This approach fits significantly more tools into a cart without adding bulk.
Space saving tactics for compact carts include the following:
- Add stackable trays inside deep drawers to create two levels of storage.
- Mount small hooks on side panels for hanging pliers or measuring tools.
- Choose slim organizers over wide trays to preserve drawer width.
- Reserve the bottom drawer for rarely used items to keep upper space open.
A smaller cart with a disciplined layering system often holds more usable storage than a larger cart with no plan at all.
Step 9: Prevent Rust and Scratches During Storage
Preventing rust starts with controlling moisture exposure, since humidity and leftover residue on metal surfaces are the leading causes of corrosion inside a tool cart. This is a separate concern from impact protection, which dividers and foam inserts already handle.
Store the cart in a dry area away from direct rain or high humidity. Wipe down metal tools after outdoor use before placing them back in a drawer. Applying a light coat of protective oil to blades and metal surfaces once a month also helps stop surface rust before it starts.
Common Mistakes That Lead to a Cluttered Cart
Most cluttered tool carts share a small set of repeated habits rather than one single cause. Identifying these early prevents the need for a full reorganization down the line.
| Mistake | Why It Causes Clutter |
| Skipping the sorting step | Broken or duplicate tools take up valuable space. |
| Ignoring weight placement | Top heavy carts become unstable and unsafe. |
| Mixing small and large items | Small parts get lost among bigger tools. |
| No labeling system | Tools get returned to the wrong spot. |
| Overfilling the top surface | Frequently used tools become harder to reach. |
Avoiding these habits keeps a tool cart functional for the long term without requiring frequent resets.
A well organized Tool Cart depends on a consistent system rather than expensive accessories. Sorting by use, grouping by category, respecting weight placement, and protecting tools with dividers all work together to keep a cart efficient.
Whether you use a HOMCOM tool cart or another model, following these organization habits and spending a few minutes on upkeep after each project will keep your storage system running smoothly for years.
FAQs
Choose a tool cart based on the number and size of your tools. A compact cart is ideal for basic home repairs, while mechanics and professionals usually need larger, multi-drawer carts with higher weight capacity and better organization.
A tool cart is better if you frequently move tools around a workshop or garage. It provides easier access, more storage space, and smoother mobility, while a toolbox is better suited for carrying a smaller set of tools.
Look for durable steel construction, smooth-rolling casters, locking drawers, a high weight capacity, and enough storage compartments for your tools. Extra features like side trays and power strips can also improve convenience.
Yes. A tool cart helps keep tools organized, reduces clutter, and makes projects more efficient by keeping frequently used tools within easy reach. It’s a practical investment for DIY enthusiasts and homeowners.