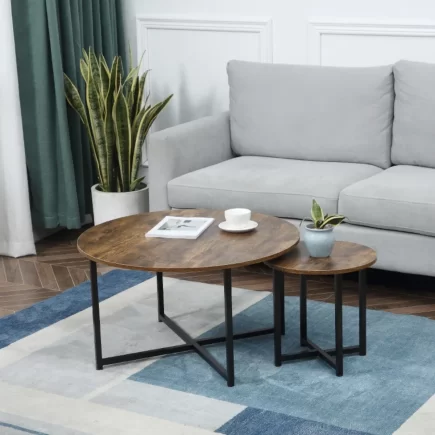
A Mid-Century Coffee Table brings timeless elegance and functional beauty to any living space. Known for its minimalist design, clean lines, and functional structure, this piece of furniture is perfect for modern homes or those aiming to blend vintage with contemporary elements. Whether assembling a new table or reviewing instructions, this article will help you achieve a sturdy and stylish result.

Before You Begin
Before diving into the assembly process, it’s crucial to ensure you have all the necessary parts and tools. Below is a list of the items required:
Parts:
- A: Table Top – 1
- B: Metal Frame – 1
- C: Middle Board – 1
- D: Legs – 4

Tools:
- ① Bolt (M6x15mm) – 23
- ② Washer – 23
- ③ Allen Wrench – 1

Now that you’ve got everything ready, let’s get started with the assembly!
Step-by-Step Assembly Instructions
Step 1: Attach the Legs to the Middle Board
The first step is attaching the four legs (D) to the middle board (C), which will form the foundation of your table. Here’s how to do it:
- Position the Middle Board: Lay the middle board (C) facedown on a clean, non-marring surface. This will protect the finish and ensure that you don’t damage the table during assembly.
- Align the Legs: Position the four legs (D) at each corner of the middle board (C). Ensure that each leg aligns with the pre-drilled holes in the middle board.
- Attach the Legs: Using bolts (①) and washers (②), attach each leg to the middle board. Tighten each bolt with the Allen wrench (③), but don’t fully tighten them just yet. Leave them slightly loose so you can make adjustments in later steps.
- Get Some Help: It’s a good idea to have a second adult help you hold the middle board in place while attaching the legs to prevent any shifts or misalignments.

Step 2: Attach the Metal Frame to the Table Top
The next step is attaching the metal frame (B) to the table top (A). This metal frame gives the table its signature mid-century modern aesthetic. Here’s what to do:
- Prepare the Table Top: Lay the table top (A) facedown on a clean, non-scratching surface. This ensures the table’s surface remains free from blemishes during the assembly process.
- Align and Attach: Position the metal frame (B) onto the underside of the table top (A). Align the holes in the frame with the corresponding holes in the table top.
- Secure with Bolts: Attach the metal frame (B) to the table top (A) using bolts (①) and washers (②). Once again, use the Allen wrench (③) to tighten them, but don’t over-tighten at this stage.

Step 3: Attach the Middle Board and Legs to the Metal Frame
Now that the legs are attached to the middle board and the metal frame is attached to the table top, it’s time to connect everything together:
- Align the Middle Board with the Metal Frame: Stand the middle board (C) with its attached legs next to the metal frame (B). Carefully align the metal frame with the pre-drilled holes in the middle board.
- Attach the Middle Board to the Frame: Use bolts (①) and washers (②) to secure the middle board (C) with the metal frame (B). Once again, don’t fully tighten at this point, as adjustments will be needed later.
- Get Assistance: Have a second person hold the middle board in place while you complete this step to ensure everything stays aligned and stable.

Step 4: Stand Up and Tighten the Bolts
With all the components connected, it’s time to make the final adjustments:
- Check Stability: Stand the coffee table upright on a flat, level surface. Give the table a gentle shake to check for any wobbling or instability.
- Tighten the Bolts: Gradually tighten each bolt (①) one by one. Be sure to tighten them sequentially. This ensures the pressure is evenly distributed, maximizing the stability of the table.
- Final Adjustments: Make sure each bolt is tightened securely, but don’t overtighten. You want the bolts to be firm but not causing strain on the table’s structure.

Once all the bolts are tightened, your Mid-Century Coffee Table is ready for use.
Care and Maintenance Tips for Your Mid-Century Coffee Table
To keep your coffee table looking its best, follow these care and maintenance tips:
- Protect Your Floors: Furniture may scratch floors, so it’s recommended to use furniture pads under the table legs to protect your floors.
- Avoid Hot Items: Do not place hot items directly on the table surface. Use coasters or placemats to avoid heat damage.
- Gentle Cleaning: Clean your table with a mild soap solution and a damp cloth. Avoid using harsh cleansers or polishes that could damage the surface.
- Keep Away from Sunlight: Do not place your coffee table in direct sunlight to prevent fading or warping of the material.
- Use a Padded Barrier for Writing: Avoid writing directly on the table surface without a padded barrier underneath to protect it from scratches.
- Indoor Use Only: This table is for indoor use only. Do not place it outside, as exposure to the elements can damage the material.
- Avoid Commercial Use: The table is designed for residential use only and is not intended for commercial applications.
- Cleaning Spills: If spills occur, clean them immediately using a clean, non-colored, lint-free cloth to avoid stains.
- Child Safety: Children should not climb or jump on the table to prevent any potential damage or injury.
By following these care and maintenance tips, you can ensure that your Mid-Century Coffee Table remains beautiful and durable for years to come.
Assembling a Mid-Century Coffee Table doesn’t need to be complicated. With the right parts, tools, and a step-by-step approach, you can have a functional and stylish coffee table that adds a touch of elegance to your living room. The minimalist design, paired with the table’s durability, ensures it will last for years to come, enhancing the aesthetic of any room.
You can also download the Mid-Century Coffee Table Manual(PDF) for your reference.
FAQs
1. Can I assemble the coffee table alone?
While it’s possible to assemble the table alone, it’s recommended to have a second person help, especially when attaching the middle board to the metal frame, to prevent misalignment and ensure stability.
2. Is it safe to place my coffee table near a fireplace?
It’s not recommended to place the coffee table too close to a fireplace, as heat can damage the wood and finish. Keep it a safe distance away to avoid potential warping or discoloration.
3. What should I do if the table top feels loose after assembly?
If the table top feels loose, check if the bolts securing the metal frame to the table top are fully tightened. Tighten them slowly and evenly to ensure the table top is securely attached.
4. Can I use my coffee table outdoors?
No, the Mid-Century Coffee Table is designed for indoor use only. Exposure to outdoor elements like moisture, sunlight, or extreme temperatures can damage the table’s materials and finish.


