


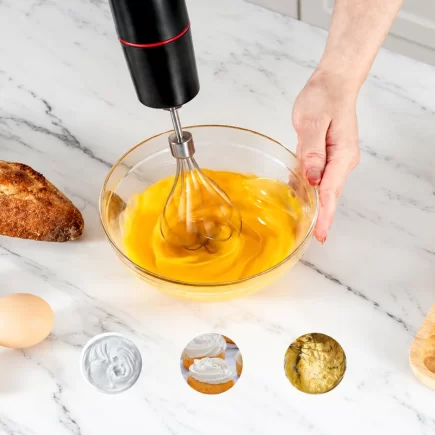



























Cleaning a hand blender is easy once you know which parts can touch water and which cannot. Unplug the appliance, detach every accessory, wipe the motor unit and coupling units with a moist cloth, and wash the remaining accessories in water, keeping every part out of the dishwasher. For food that does not rinse off easily, run the blade end or whisk in water with a drop of dish detergent for about 10 seconds, then rinse and dry. The five easy steps below put this into a simple routine you can follow every time.
What You Need to Clean a Hand Blender
You do not need specialized cleaning chemicals to clean a hand blender after normal food preparation. A few household cleaning supplies are usually enough to remove grease, sauces, dairy residue and other food particles.
| Cleaning Supply | Purpose | Important Note |
| Mild liquid dish soap | Removes grease, oils and food residue. | Use a small amount diluted in warm water. |
| Warm water | Loosens food residue and rinses away soap. | Avoid excessively hot water unless the manual permits it. |
| Soft cleaning cloth | Wipes the motor unit and coupling components. | Keep the cloth damp rather than soaking wet. |
| Soft-bristled cleaning brush | Helps remove residue from around the blade guard and attachment crevices. | Keep fingers away from sharp blades. |
| Clean, dry towel | Removes moisture after washing. | Dry all permitted parts thoroughly. |
| Beaker | Holds water for rinsing or manual cleaning where appropriate. | Use only as directed by the product instructions. |
Which Chemical Should You Use?
Use mild dishwashing liquid mixed with warm water to remove grease and food residue. Avoid abrasive cleaners, bleach, solvents, and other harsh chemicals unless approved by the manufacturer. Never mix cleaning products, and rinse food-contact parts thoroughly to remove soap residue.
Cleaning requires only a few basic tools. The table below explains what you need, which parts to clean, and when to use each item.
Know Which Hand Blender Parts Can Get Wet
Before cleaning, identify which parts can be washed and which must stay dry. Always check the manufacturer’s instructions before rinsing or immersing detachable components.
| Part | Cleaning Method |
| Motor unit | Wipe with a damp cloth; never immerse |
| Blender bar | Wash according to the manual |
| Whisk and frother | Use warm, soapy water if permitted |
| Coupling unit | Wipe with a damp cloth |
| Chopper lid | Wipe clean unless washing is approved |
| Chopper bowl and beaker | Wash with warm, soapy water if permitted |
| Chopper blade | Follow the manual and handle carefully |
Important: Never immerse the motor unit, power cord, or plug in water. Do not assume detachable parts are dishwasher-safe.
Step-by-Step Guide to Cleaning a Hand Blender
Work through the steps in order, starting with the power supply before any part comes near water. Each step lists the tools it needs.
Step 1. Unplug the Hand Blender and Remove the Attachments
What You Need: A clean work surface and a dry towel.
Always disconnect the appliance from the electrical outlet before cleaning. This prevents accidental activation while you handle the blade or detach the accessories.
- Switch off the hand blender and unplug the power cord from the electrical outlet.
- Place the appliance on a stable, dry work surface away from the sink.
- Allow any hot attachment or food residue to cool before handling it.
- Remove the blender bar from the motor unit according to the product instructions.
- Detach the whisk coupling unit or chopper assembly as required.
- Remove the whisk or milk frother from its coupling unit.
- If cleaning the chopper, remove its lid and carefully detach the blade unit using its designated gripping area.
Keep the motor unit, cord and plug away from the sink and splashing water. Place the detached components on a clean towel so that you can identify each part before washing it.
Step 2. Wipe the Motor Unit and Coupling Components
What You Need: A soft cloth, warm water and a small amount of mild dish soap if needed.
The motor unit and coupling components should not be immersed in water. Instead, use a damp cloth to remove food splashes, grease and residue from their exterior surfaces.
- Add a few drops of mild liquid dish soap to a bowl of warm water.
- Dip the soft cloth into the solution and wring it out thoroughly.
- Wipe the exterior of the motor unit, including the handle and speed-control area.
- Clean the outside of the chopper lid and whisk the coupling unit with the same damp cloth.
- Use a clean cloth dampened with plain water to remove any remaining soap from the surfaces, avoiding openings and electrical connections.
- Wipe the components with a dry cloth and allow them to dry completely.
Do not pour water directly onto the motor unit or place the coupling components under a running faucet. Keep moisture away from electrical openings, connection points, switches and the power cord.
What to Avoid: Do not use abrasive sponges, scouring powders or harsh cleaning chemicals on the appliance housing. These products may damage its finish.
Step 3. Clean the Blender Bar and Blade Guard
What You Need: Warm water, mild dish soap, a soft-bristled cleaning brush and a clean towel.
The blender bar can collect thick sauces, purees, soups and other food residue around its stainless-steel shaft and bell-shaped blade guard. Cleaning it soon after use helps prevent food from drying and becoming harder to remove.
- Make sure the blender bar is detached from the motor unit and the appliance remains unplugged.
- Remove loose food residue from the exterior of the shaft using a soft cloth or a gentle rinse if the manual permits it.
- Prepare warm water with a small amount of mild dish soap.
- Wash the permitted surfaces of the blender bar, paying attention to the outside of the blade guard.
- If food remains around the guard, use a soft-bristled brush to loosen it. Keep your fingers clear of the cutting edges.
- Rinse the washed surfaces thoroughly using the method approved by the manufacturer.
- Check for remaining food particles without touching the blade.
- Dry the attachment with a clean towel and allow any difficult-to-reach areas to air-dry completely.
Never immerse the motor unit while cleaning the blender bar. Do not pull food from around the blade with your fingers, and do not use a metal utensil that could damage the blade or guard.
For stubborn residue: Soak only the permitted detachable parts in warm, soapy water if the manual allows it. A short soak can help soften dried food before brushing. Do not soak the motor unit or any component that the manufacturer says must remain dry.
Step 4. Clean the Whisk and Milk Frother
What you need: Warm water, mild dish soap, a soft cloth and a clean towel.
The whisk and milk frother can collect cream, milk, egg and other ingredients between their working surfaces. Cleaning them promptly helps prevent residue from drying.
- Confirm that both attachments have been removed from the whisk coupling unit.
- Fill a clean bowl with warm water and add a small amount of mild dish soap.
- Wash the whisk gently, moving it through the solution to loosen food residue between the wires.
- Clean the milk frother using the same solution, paying attention to any areas where milk residue has collected.
- Use a soft brush where necessary, avoiding excessive pressure that could bend or damage the attachment.
- Rinse both attachments thoroughly using the method permitted by the product manual.
- Shake off excess water carefully and dry them with a clean towel.
- Allow both attachments to air-dry completely before reconnecting them to the coupling unit.
Do not immerse the whisk coupling unit while washing the whisk or milk frother. Only the detachable attachments should be washed using the method approved for those parts.
Cleaning Tip: If milk or cream has dried on an attachment, let the permitted washable part sit in warm, soapy water for a short period before cleaning. Avoid scraping residue with sharp tools.
Step 5. Clean the Chopper and Beaker in Water
What You Need: Warm water, mild dish soap, a soft cloth or brush and a clean towel.
The chopper bowl and measuring beaker can collect oils, chopped vegetables, nuts, cheese and other food particles. The chopper blade requires extra care because its cutting edges are sharp.
Clean the Chopper Bowl
- Make sure the appliance is unplugged and the chopper lid has been detached.
- Remove loose food particles from the bowl.
- Wash the bowl with warm water and a small amount of mild dish soap if the manual permits immersion.
- Clean the bottom, sides and rim, where food residue can collect.
- Rinse thoroughly and dry with a clean towel.
Clean the Chopper Blade Unit
- Handle the blade unit only by its designated safe gripping area.
- Prepare warm, soapy water if the manufacturer’s instructions permit washing the blade unit this way.
- Clean the permitted surfaces carefully, keeping your fingers away from every cutting edge.
- Use a soft brush or suitable cleaning tool to loosen food particles trapped around the blades.
- Rinse according to the product instructions, keeping your hands clear of the cutting edges.
- Dry the blade unit carefully and place it somewhere stable and secure while it finishes drying.
Never reach into the chopper blade assembly to remove food by hand. Do not leave the blade loose in a sink full of soapy water, where its sharp edges may be difficult to see.
Clean the Beaker
- Rinse out any remaining ingredients.
- Wash the inside and outside with warm water and mild dish soap.
- Pay attention to the bottom and rim, where food residue can remain.
- Rinse thoroughly to remove detergent.
- Dry with a clean towel or allow the beaker to air-dry completely.
Once all the permitted washable components are clean and dry, store the blade unit safely and keep the other accessories together. Reassemble the appliance only when needed, following the manufacturer’s instructions.
Common Hand Blender Cleaning Mistakes to Avoid
Small mistakes during cleaning can damage the appliance or increase the risk of injury. Keep the following precautions in mind.
| Mistake | Why It Matters | Better Approach |
| Cleaning while the appliance is plugged in | The motor may activate unexpectedly | Unplug before disassembling or manually cleaning |
| Immersing the motor unit, cord or plug | Water can damage electrical components and create an electric-shock hazard | Wipe these parts with a damp cloth |
| Touching the cutting edges | The blades can cause cuts even when the motor is off | Hold attachments by their designated safe gripping areas |
| Removing food with fingers | Residue may be lodged close to sharp blades | Use a suitable soft brush after disconnecting power |
| Using harsh chemicals | Cleaners may damage materials or leave unwanted residue | Use mild dish soap and rinse thoroughly |
| Assuming every attachment is dishwasher-safe | Heat and detergents may damage incompatible components | Check the product manual before using a dishwasher |
| Reassembling wet attachments | Trapped moisture can affect storage and hygiene | Dry all permitted washable components completely |
| Using a damaged power cord or appliance | Damaged electrical components can be hazardous | Stop using the appliance and contact the manufacturer’s service team |
The 10-Second Clean for Stuck-On Food
If food is not easily rinsed off the blade or whisk after Step 3 or Step 4, a quick clean using the blender itself can help. The beaker that comes with the hand blender holds the water and detergent.
How to Do the Quick Clean
- Pour water into the beaker and add a drop of dish detergent.
- Attach the blender bar or whisk, then plug the cord into the outlet.
- Immerse the blade end of the blender bar, or the whisk, in the water in the beaker.
- Run the unit for about 10 seconds.
- Unplug, rinse under running water, then dry.
Keep the Motor Unit Out of the Water
Only the blade end or the whisk goes into the water. The motor unit and the coupling units must not be immersed, so they stay above the waterline.
Common Mistakes to Avoid
Small habits can shorten the life of a hand blender. This table covers the main ones to avoid.
| Avoid This | Why It’s Harmful |
| Immersing the motor unit, cord or plug | Risk of fire, electric shock and personal injury |
| Putting accessories in the dishwasher | The accessories are not dishwasher-safe |
| Cleaning or detaching parts while plugged in | Parts should only be handled with the appliance unplugged |
| Immersing the chopper lid or whisk coupling unit | These parts should only be wiped with a moist cloth |
| Handling the blades carelessly | The cutting edges of the blades are very sharp |
How to Dry and Store a Hand Blender
Proper drying and storage help keep your hand blender clean and ready for its next use.
Follow these storage tips:
- Dry every attachment: Remove visible moisture with a clean towel and allow the parts to air-dry completely before storing.
- Protect the blades: Store the chopper blade and blender bar in a secure location where their cutting edges cannot accidentally injure someone.
- Keep the motor unit dry: Store the motor unit away from the sink, damp surfaces and other sources of moisture.
- Keep the cord safe: Avoid wrapping the cord tightly around the appliance or placing it near hot surfaces.
- Store the components together: Keep the beaker, whisk, frother and other accessories in a clean, dry location.
- Inspect before use: Check the cord, plug, attachments and blade guard for visible damage before reconnecting the appliance.
If the power cord, plug or motor unit is damaged, do not attempt to repair the electrical components at home. Stop using the appliance and contact the manufacturer’s service team.
Make Everyday Food Preparation Easier With Aosom
A hand blender can help prepare soups, sauces, purees and other everyday recipes, while its detachable accessories offer additional options for chopping, whisking and frothing.
Explore the LINKChef 1000W 5-in-1 Immersion Hand Blender at Aosom to learn more about its blending functions, adjustable speeds and included accessories.
With the right cleaning routine, you can remove food residue after use, care for each attachment properly and keep your kitchen appliance ready for everyday food preparation.
FAQs
On a 5-in-1 hand blender, the blender bar handles dips, sauces, soups, mayonnaise, baby food and milkshakes. The chopper takes on meat, cheese, onion, herbs, garlic, carrots and nuts, while the whisk is made for whipping cream, beating egg whites and mixing sponge cakes and ready-mix desserts.
This hand blender is designed to run for no longer than 1 minute at a time, followed by a break of at least 10 minutes. After three batches in a row, the appliance should cool down to room temperature before processing continues.
Yes. The hand blender works in the included beaker or any other vessel, including a pot. To prevent splattering, the blade guard should stay completely immersed in the ingredients while the appliance moves slowly up, down and in circles until the mixture is smooth.
Yes, with the blender’s whisk attachment. The whisk inserts into the whisk coupling unit, which then connects to the motor unit. Starting on Switch I and moving to Switch II after about 30 seconds helps keep the cream from splashing out of the bowl.