














Strong calves do more than make your legs look balanced. They power every step you walk, every jump you land, and every heavy squat you stand up from. Yet calves are one of the most skipped muscle groups in the gym, partly because many people are not sure how to set up a calf raise machine or what “good form” actually feels like on it.
This guide fixes that. Below you will find 10 easy steps for using a seated calf raise machine, the most common plate-loaded design, written so a complete beginner can follow along and an experienced lifter can still pick up a few refinements.
Step 1: Get to Know the Machine and Check It Is Safe
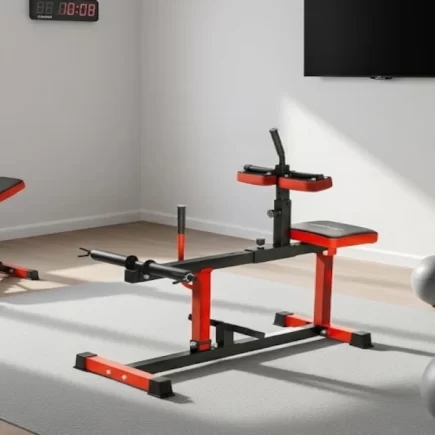
Before you load any weight, spend two minutes looking over the machine. Knowing what each part does makes every later step easier.
- Padded seat: Supports your hips so your thighs stay still.
- Adjustable knee pad (thigh pad): The padded bar that rests over your lower thighs and carries the load into your calves.
- Safety handle: The lever you pull to release the weight, and push back in to lock it when you finish.
- Foot platform: The bar where you place the balls of your feet. A textured, non-slip surface keeps you steady.
- Plate post: The sleeve at the front or back where you slide on weight plates.
Then run a quick safety check: Shake the frame gently to confirm it does not wobble, make sure the bolts are tight, confirm the pad slides and locks properly, and look for cracked padding or loose pins. Put the machine on a flat, level floor, ideally on a rubber mat, with a clear space around it so you can step in and out safely.
Step 2: Warm Up Your Calves and Ankles
Cold calves and stiff ankles are a common reason people feel tightness or cramping on their first sets. Take three to five minutes to warm up:
- Walk or march in place for 2 minutes to raise your body temperature.
- Do 15 to 20 bodyweight calf raises on the floor, pausing for a second at the top.
- Rotate each ankle 10 times in each direction.
- Finish with a few gentle bodyweight heel drops off a step to open up the range of motion.
Your warm-up should leave your calves feeling slightly pumped, not tired.
Step 3: Adjust the Knee Pad to Fit Your Body
This is the step beginners most often skip, and it makes the biggest difference to comfort. The knee pad should press on the lower part of your thighs, just above the knee caps, not on the knee itself and not up near the hips.
- Sit on the seat and slide your legs under the pad to check the fit.
- If the pad is too high, it will press on your hips and limit your range; if it is too low, it will sit on your knees and feel uncomfortable.
- Move the pad to the height or length setting that lets your legs rest naturally with your knees bent at about 90 degrees.
- Make sure the adjustment pin or knob is fully locked before you add weight.
Adjustability matters here. The Soozier Seated Calf Raise Machine, for example, has adjustable thigh pads (the listing mentions 5 handle heights and 4 lengths, with a knee pad height range of about 37 to 41.7 inches), so shorter and taller users can both get a proper fit.
Step 4: Load the Weight Plates Evenly
Now choose your starting weight. Calves are tough, hard-working muscles, but this is still the time to be conservative. Pick a load you can lift for 12 to 15 controlled reps with a full range of motion and a slight burn at the end.
- Slide the plates all the way onto the plate post, with the heaviest plates closest to the machine.
- Use the same plates on each side if your machine has two posts, so the lever stays balanced.
- Fit a collar or clip if the machine supports one, so plates cannot slide off.
- Beginners can start with a single 10 lb or 25 lb plate and add weight over the following weeks.
Many Plate-Loaded Seated Machines have dual Olympic-style posts that accept both 1-inch and 2-inch plates, which makes it easy to use plates you already own.
Step 5: Sit Down and Set Your Body Position
Sit down on the seat and slide your legs under the knee pad. Your goal is a tall, stable seated posture:
- Sit back on the seat with your hips as far back as the pad allows.
- Keep your chest up, shoulders relaxed, and your spine neutral. Do not slouch or lean forward over the pad.
- Rest your hands lightly on top of the knee pad, or hold the handle if your machine has one.
- Keep your thighs still throughout the set, so the work stays in your calves.
Step 6: Place the Balls of Your Feet on the Foot Platform
Foot position decides how well the exercise works. Place the balls of your feet on the platform, with your heels hanging off the edge so they can drop below the platform and stretch the calf fully.
- Point your toes forward, with your feet about hip-width apart.
- Keep your weight on the ball of the foot, not the toes. If you feel pressure in the base of your toes, slide your feet slightly forward or back until the load feels comfortable.
- Wear flat, stable shoes with good grip.
- Once you are comfortable with the basic position, you can experiment with toes slightly pointed in or out in later sessions to change where you feel the work. For now, keep them straight.
Tip: If you feel a strong stretch through the bottom of your foot instead of your calf, reduce how far your heels drop for now and build range of motion over time.
Step 7: Lift Slightly and Release the Safety Handle
Most plate-loaded seated machines have a safety lock that holds the lever up until you are ready. To start your set:
- Press up through the balls of your feet to raise the weight a little, which takes the load off the lock.
- While holding the weight up, pull the safety handle out (or turn it, depending on your model) with your hand.
- Hold the top position for a second before you begin lowering.
Move smoothly here. Releasing the safety while the weight is resting on the lock can make the lever drop abruptly.
Step 8: Lower Your Heels Slowly for a Full Stretch
Now lower your heels slowly below the level of the platform, until you feel a deep stretch through the calves. The lowering phase is just as important as the lifting phase, so do not let the weight drop.
- Take about 2 to 3 seconds to lower.
- Keep your thighs against the seat and the pad. Do not let your hips or knees move.
- Pause for a moment at the bottom without bouncing.
- If you feel stretching pain in the bottom of the foot, shorten the depth slightly.
Step 9: Drive Up, Squeeze at the Top, and Repeat
From the bottom position, press up through the balls of your feet and lift your heels as high as you can, as if you were trying to stand on your tiptoes.
- Exhale as you push up.
- Pause for 1 second at the top and squeeze your calves hard.
- Keep the movement controlled, with no bouncing and no jerking the weight.
- Repeat for your planned number of reps, then lower smoothly before the next rep.
Recommended Sets and Reps
| Training Goal | Sets | Reps | Frequency |
| Beginners | 2–3 | 12–15 | 2–3 days per week |
| Muscle Growth | 3–4 | 10–20 | 2–4 days per week |
| Strength and Power | 3–4 | 6–12 | Adjust based on recovery |
Rest 45 to 90 seconds between sets. Once you can finish all your sets with good form and a full range of motion, add a small amount of weight or an extra rep or two next session.
Step 10: Re-Rack the Weight, Cool Down, and Stretch
After your last rep, press up through your toes, slide the safety handle back in to lock the lever, then lower your weight onto the stops. Never let go of the handle while the weight is unsupported.
- Step away from the machine slowly and walk for a minute to let your calves relax.
- Stretch each calf for 30 seconds: Stand facing a wall, step one foot back, keep the heel down and the back knee straight, and lean forward gently.
- Do a second stretch with the back knee slightly bent to reach the deeper soleus muscle.
- Drink water and take off the plates if the machine is shared or if you need the floor space.
Make a note of your weight and reps in your phone or a workout log. Tracking is the simplest way to apply progressive overload.
Common Mistakes to Avoid on the Calf Raise Machine
- Using too much weight: Heavy loads make you shorten the range of motion and bounce. Choose a weight that lets you pause at both the top and bottom.
- Bouncing at the bottom: The Achilles tendon takes the stress instead of the muscle. Slow down and pause.
- Cutting the range short: Half reps build half the muscle. Go deep at the bottom and high at the top.
- Letting the thighs move: If your thighs rise or your hips shift, the load is leaving your calves. Lower the weight.
- Standing on your toes instead of the balls of your feet: This can cause foot discomfort and reduces calf tension.
- Skipping the stretch: Tight calves limit ankle mobility and can lead to cramps, so always finish with a stretch.
Calf Raise Machine Tips for Better Results
- Train calves often: Calves handle high frequency well, so 2 to 4 short sessions a week can work better than one very long one.
- Mix seated and standing raises: The seated version emphasizes the soleus and the standing version the gastrocnemius, so both together give fuller development.
- Use tempo: A 2 to 3 second lowering phase, a 1 second pause at the top, and a controlled lift is a reliable rhythm for most lifters.
- Progress gradually: Add weight or reps in small steps only when your form stays clean.
- Be patient: Calves can be slow to change, so judge your progress over weeks and months, not days.
Start Using the Calf Raise Machine the Right Way Today
Using a calf raise machine properly comes down to a few habits: set the pad correctly, load a sensible weight, place the balls of your feet on the platform, and move through a slow, full range of motion with a pause at the top. Follow the 10 steps above, track your weights and reps, and add load gradually. Do that consistently and your calves will get stronger, your ankles more stable, and your lower legs better balanced with the rest of your body.
FAQs
It can help a little, mostly for beginners. Calves handle lots of reps, but easy reps every day stop working after a while. Heavier sets with rest days build more muscle and avoid soreness.
Too many reps can leave your calves sore or tight. Bouncing or lifting too heavy can strain your Achilles tendon or ankles. Calves also grow slowly for many people, so be patient and stop if you feel sharp pain.
The top three are the standing calf raise, the seated calf raise, and the donkey calf raise. Standing raises work the gastrocnemius, seated raises work the soleus, and donkey raises give a deep stretch. Using at least the first two covers both main calf muscles.
Calves are used all day for walking, standing, and running, so they are already strong and used to work. Genetics also plays a big part, since some people naturally have longer, fuller calf muscles. To keep growing, they need heavier weight, higher reps, and steady training over many months.